Posted on

C&E Marshall Moseley versus K&D Staking Tools: Check the Facts

After World War II, C&E Marshall started a price war with Kendrick & Davis, Co. It’s easy to understand, Marshall purchased the Moseley Company and acquired two products: The Lathe and the Moseley Staking Tool. Marshall released a modified version of the K&D 18R. Marshall called their product “The Moseley Staking Tool”  and offered it for $63.50 to $87.50.  K&D’s set cost $94.

In today’s dollars that doesn’t sound like much difference. I would chose an all tempered steel and heavy chrome plated K&D staking tool to the part steel, part plastic Moseley tool.

Let’s talk in 2014 dollars. In 1946, $63.50 would have the same purchasing power as $618 today. When I stood about three feet tall, my dad used to buy me a Coca Cola for a nickle (5 cents).

In 2014 dollars, a watchmaker could get into a friction jeweling set for $618. The K&D’s friction jeweling set would start at $916. That’s a significant difference.

Let’s look at the product comparison’s. The first figure on the top left is Moseley’s tool. Below it, Figure 3 is the K&D tool. Today, C&E Marshall would have their head handed to them in court. Why? Because, K&D owned the patent. See Figure 5 and the patent date is 1938. That would give K&D the exclusive rights to market their product for nine more years before a competitor could build a similar product. You don’t question the similarities in the designs do you?

Marshall also took K&D head on in the 38mm die plate staking frame. Marshall offered a product comparable to the Model 600 for $24.50 versus K&D’s $42. In 2014 dollars that’s $234 versus $409.

In 2014, you can’t buy either brand new. The K&D 18R Deluxe sells for about $300 on eBay. The Moseley brings about $150.

Why the difference? K&D furnishes several accessories Moseley didn’t even make. K&D included 12 jeweling stakes with handle; two balance staff removers; six jeweling stumps; two adjustable roller removers; several additional “types of” punches; canon pinion tighteners; and cross hole punches to mention a few.

In the 600 Series – Little Giant lines, the C&E Marshall Moseley clone generally sells for more than the K&D set. The two frames are identical with the exception of old plastic in the Moseley tools.

Frankly, I’m stumped.

(Click on any image to zoom)
Figure2 
Figure 1
Figure 3
Figure 4
Figure 5

Posted on

K&D 43-329 Staking Incabloc Rollers

K&D manufactured the the 43-329 Incabloc set specifically to stake Incabloc “Rollers”. The designers of the Incabloc system intended to keep pressure off of the balance pivots and transfer shock to the Incabloc mechanism.

From 1951 Lindstrom Catalog

K&D invented their Incabloc staking set to reset the rollers and take the stress off of the pivots of the balance staff after a severe shock. After such an event, jewels tend to move sideways or upwards and the shoulder of the balance staff comes into contact with the setting and stopping it.

If the Incabloc rollers suffer damage, you can remove the roller with the 329 punches while holding the roller in place with the designated stumps.

K&D designed this set for bracelet style watches. Typically, a watchmaker would buy the 329 in addition to to other accessories not included with the 18R Deluxe staking set.

Posted on

Some Important American Tools for Hairsprings and Balances Wheels

Hairspring Centering Tool

These are well-know tools and often difficult to find. Interestingly enough, they are American made. Some of them are over 100 years old. 


You may not find contemporary replacements for them, since no one manufacturers them now.

I don’t know that it matters, many of my tools are over 100 years old and work well. I’m not sure the manufacturers expected them to function well for as long as they have, but in those days, planned obsolescence didn’t exist.

What do we have here?

  • Hairspring Centering Tool – (not a caliper)
  • Duplex dual jeweled and safety table remover – handles dual roller tables
  • Rex adjustable roller table remover
  • MB Automatic Staff Remover – spring loaded and handles riveted staffs without bending the wheel or arms.
  • K&D # 50B Staff Remover and matching punch
The first tool allows a user to see the hairspring and make adjustments such as centering or removing bends without transferring the hairspring from on platform to another. It allows you to see the hairspring as it appears under the balance cock.

Duplex Dual Table Removers


Adjustible Table Remover

Many watches are made without a safety roller. The better watches, however, have a standard roller on which the jewel sits and a smaller roller above it. The Duplex tool allows you to remove both without having to set-up a staking tool for each roller.


The adjustable table remover allows you to tighten the stump to the roller without having to search through stumps to find one that fits naturally.

Staff Remover (Punch)


The automatic balance staff remover fits in the sleeve of a staking tool. The balance sits on a stump or the die plate itself. A gentle tap on the top of the “punch” will gently push a riveted staff out of its hole without bending the arms or the balance itself.  Even so, it is always a good idea to check the balance for poise and truth with calipers.


The K&D 50 balance staff remover is the most popular of all staff removing tools.  Here is a brief instruction from K&D’s advertisement:

Select proper hole in your Staking tool dieplate to let the hub of staff through. Place the balance with  with staff to be removed in same. Set the remover over the same and insert its punch through the staking tool and main body of remover. Holding the punch in position over pivot with the finger of your right hand tighten the knurled remover nut upwards against staking tool arm. Stop arm of remover will swing against body of Staking Tool and prevent body of tool turning while tightening knurled sleeve. Do not over tighten this sleeve; it is not necessary. Now strike punch a sharp blow with light hammer and staff will come out without injury to Balance; riveting of staff simply being sheared off..


K&D 50B


All together


Posted on

Friction Jeweling Tool Precision Press-Fitting of Watch Bearings, Hands, Collets and Press-fit parts

Henry B. Fried invented and patented a friction jeweling tool in 1976. The Patent Office awarded him the patent just about the time we began to see a take-over of the watch industry by LED and Quartz movements.

The description and drawing of his patent provides a wealth of information about jeweling, balance and hairspring work. Following is the information:

Watch jeweling tool
US 4028967 A

Publication date
14 Jun 1977
Filing date
30 Mar 1976
Priority date
30 Mar 1976
Inventors
Original Assignee
ABSTRACT

A tool for the precision press-fitting of watch bearings, watch hands, collets and other precision press-fit parts. The tool is used in conjunction and as an attachment with traditional watchmakers’ staking sets. The tool consists of a cylindrical metal rod, hollow and slit at its lower end to accommodate friction-fit pushers of various end-dimensions. The cylindrical rod is threaded in metrical or inch pitch for one-third of its lower length to accommodate a knurled disk upon which are marked the divisions of a linear unit, similar to the thimble of a micrometer. At its upper end, the rod is milled to a short rectangular section. Upon this rectangular end is positioned a flat metal clamp with close fitting but not tight, rectangular hole. The clamp is split at its outer end, forming two legs which are form-bent downward to straddle the gooseneck of a staking set. The threaded, micrometer nut is threaded up against the bottom of the staking set’s hollow punch-guide. In this set-up, any further manual movement of the knurled nut raises or lowers the cylindrical rod, thus performing the press-fitting functions.

IMAGES
(See table below) 
CLAIMS

I claim:

1. A watch-jeweling tool, comprising:
a standard having a base portion, an anvil supported upon said base portion, an upstanding neck portion fixedly secured upon said base portion the free end of which over-hangs said anvil, and a guide post fixedly secured to the free end of said over-hanging neck portion so as to be disposed above said anvil;
an elongated punch having a central portion slidably disposed within said guide post of said standard, a member fixedly secured to said central portion at one end thereof, and a threaded portion fixedly secured to said central portion at the other end thereof, said member, said central portion, and said threaded portion being disposed serially along the longitudinal axis of said punch;

a pusher disposed within said threaded end portion of said punch and adapted to cooperate with said anvil of said standard in performing a press-fitting operation;

a manually operable nut threadedly engaged upon said threaded portion of said punch and adapted to abut the lower portion of said guide post; and

a clamp having means slidably engaging said member of said punch and additional means engaging said neck portion of said standard for preventing rotation of said punch as said nut is rotated in order to threadedly actuate said punch and move the same along the longitudinal axis thereof when said nut abuts said lower portion of said guide post and said pusher is operatively engaged with said anvil.

2. A tool as set forth in claim 1, wherein:
said punch is made of metal.

3. A tool as set forth in claim 2, wherein:
said metal is steel.

4. A tool as set forth in claim 1, wherein:
said member of said punch is an upstanding projection having a rectangular cross-section; and
said means of said claim slidably engaging said punch member comprises means defining a rectangular-shaped aperture within said clamp which is adapted to be fitted over said rectangular projecting member.

5. A tool as set forth in claim 1, wherein:

said end portion of said punch, within which said pusher is disposed, is longitudinally split; and
said pusher is disposed within said split end of said punch by means of a friction-fitting.

6. A tool as set forth in claim 1, wherein:

the upper surface portion of said nut is calibrated with marked divisions thereon which correspond to the thread pitch of said threaded portion of said punch and that of said nut,
whereby the rotation of said nut may be readily corresponded to the linear displacement of said punch toward said anvil.

7. A tool as set forth in claim 1, wherein:
said additional means of said clamp comprises a pair of legs which straddle said neck portion of said standard.


DESCRIPTION


DESCRIPTION OF THE INVENTION

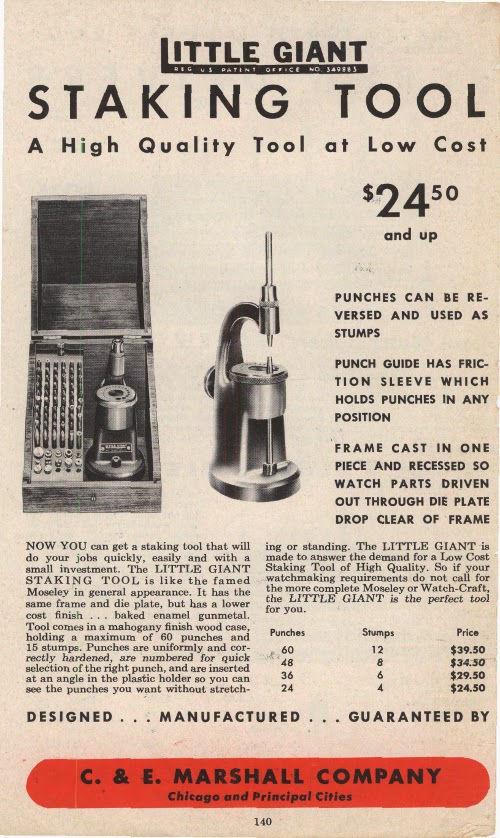
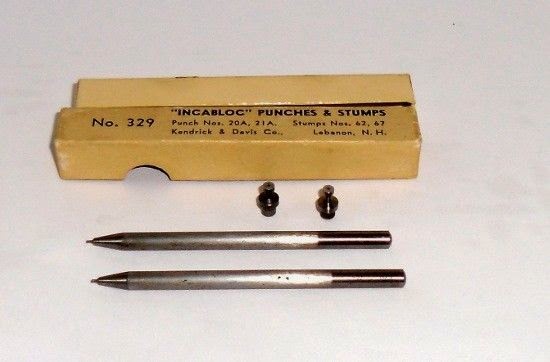
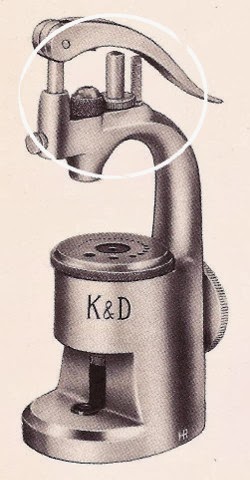
Referring to the figures, the traditional form of a watchmakers’ staking set 1, allows cylindrical rod punches, drills of a precise diameter to fit into its hollow guide post 17. A steel punch, 2, or of any other metal is inserted in the guide post 17. Then the calibrated, knurled nut, 6, is threaded onto the threaded section 3 of the punch 2. Into the hollow, slit lower, threaded end of this punch is fitted one of the pushers 11, 12, 13, 14, whichever is just smaller than the diameter of the bearing to be inserted. These pushers remain fixed within the clutch-fitting slit 4 of the punch.

At the upper end of this punch is a short rectangular section, 8. Fitted over this rectangular section is the fixing clamp, 7, whose rectangular hole, 10, allows this to be positioned onto the punch. The fixing clamp, 7, has two arms or extensions which are adjusted to straddle the gooseneck of 1, the staking set.

The fixing clamp, 7, when in position, prevents any twisting movement of the punch. This allows both hands to operate close to one another, providing precision and stability for other delicate manipulations.
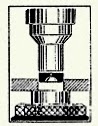
With a pusher 5 or 11, 12, 13, 14, pressing on the bearing 15, turning the nut, 6, from left to right causes the punch to descend, pushing the bearing into its tight hole, once the bearing 15 rests upon a train bridge 9 and anvil 16 and the nut 6 has been threaded upon section 3 of punch 2 so as to abut the bottom portion of post 17, as shown in FIG. 2. The depth to which the bearing is to be pushed depends on the fractions of a millimeter or other linear unit to which the nut, 6, is turned.

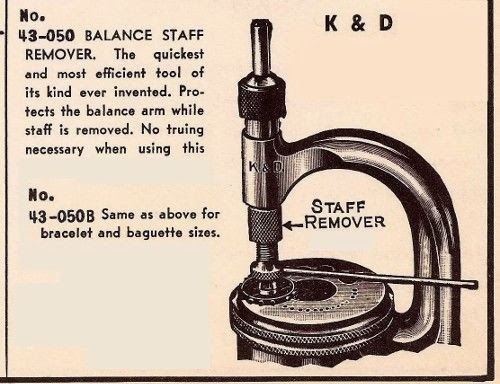
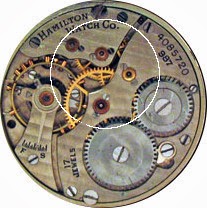
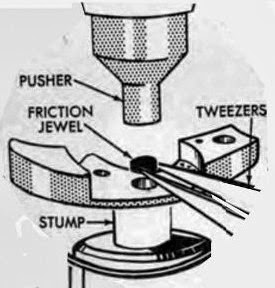
Shown in FIG. 1, is 9, a typical train bridge of a watch movement resting on the anvil, 16, of the staking set. Shown in greater detail in FIG. 2 is the split, clutch fitting end, 4, one of the pushers, 5, a jewel or bearing, 15, also shown in FIG. 3, the watch train bridge, 9, which is resting on the steel anvil, 16, of the staking set, 1.

In FIG. 2, the punch guide, 17, is shown in section for better perception of how the punch, 2, is freely slidable accommodated therein. For the same reason, the top of the punch-clamp, 7, is also shown in section.

In order to press-fit bearings of different diameters, pushers, 11, 12, 13, 14 are shown although numerous others of various dimensions can be used as, for example, 11, shows a pusher which must be larger than the bearing it is to bear against or one to press-fit hands, or collets onto a part of a timepiece or instrument. In certain instances, the bearing may have to be pressed to a level below the edge of its hole in the plate. In such a case, a pusher just a little smaller than the diameter of the bearing is chosen. In other cases, when a reduction in endshake is desired, the bearing plate is turned over and the tool exerts an exact amount of pressure to move the bearing the precise amount, governed by the movement of the metered nut, 6.

To use the device, the bearing, 15, with its chamfered edge is placed loosely over the hole in the plate, 9. The pusher, 5, or any appropriate pusher of correct diameter is then activated downward by left to right movement of the metered nut, 6, to a predetermined depth as noted hereinabove. 

Afterwards, the micrometer nut, 6, is turned in the opposite direction so as to thread the same onto a lower portion of section 3 of punch 2 whereby the nut, punch and pusher may be manually raised away from bridge 9 and anvil 16, as a result of the slidable movement of punch 2 within post 17, until the nut 6 again abuts the lower portion of post 17. The two-armed punch fixing clamp, 7, prevents the punch from turning. Thus one hand may hold the part to be manipulated while the other hand delicately turns metered but to the desired amount.

BRIEF DESCRIPTION OF THE DRAWINGS

FIG. 1 is perspective view of one embodiment of the present invention;

FIG. 1A is an exploded view of selected tool parts of FIG. 1.

FIG. 2 is an end view elevation of the tool of FIG. 1 with parts shown in cross-section; and, 

FIG. 3 is an enlarged view of the inset portion of FIG. 2.

BACKGROUND OF THE INVENTION

This invention relates to pressure tools used to insert friction, press-fit bearings of jewel material, metal or other materials into clock or watch or instrument plates. Other parts such as collets, hands for example, onto clocks, watches or instruments can be similarly fitted. Modern bearings of all materials are press-fit into tightly fitting holes in the plates of watches, clocks or instruments. Many bearings are made of synthetic jewel material. Their position relative to the height at which they must be fixed is directly related to the height of the axle of the wheel or lever contained in the bearing hole. Precision positioning is necessary so that the freedom of the pivotal movement of the turning part and axle is not restrained as it would be if the bearing height be insufficient. If the end-shakes are excessive, the axle will shift vertically and cause its attached member to fall out of engagement with its connecting neighbor.

Also, many bearings, being made of jewel material are delicate and brittle. Sudden or excessive pressure would cause fracture or shattering of these bearings.

Existing tools which insert these bearings are complicated and very expensive. Such tools insert these bearings by levered hand pressure governed only by a stop-lock adjustment. Thus, only one hand is left to guide or manipulate the plate into which the bearing is being inserted. This type of pressure does not allow for a delicacy of touch or feel, often the difference between a successful operation and a shattered bearing. Also, the large expense involved makes its use prohibitive to the average watch and clock or instrument maker. In view of the foregoing, the main object of this invention is to provide a bearing inserting device that is simple, safe and allows both hands to guide the plate and allow for close-up judgment of the pressure to be applied, it allows pressure to be applied by gradual thread-bearing pressure and the design of the tool is such that it allows it to be made at a reasonable price, available to any mechanic involved in such work.

A significant feature of this invention is that its pressure upon the object to be press-fit is by screw-feed. By this method, the operator controls the gradual pressure required and yet obtains the sense perception which ensures the insertion without fracture.

Also, the pushers can be threaded with a metric pitch of either one or two threads per millimeter. The threaded disc which governs the pressure and depth to which the part to be pressed-fit is subjected can have on its upper surface the divisions of a full millimeter, half millimeter, inches or any division of a linear unit measurement. This serves as an accurate reference when endshakes or heights to which a press-fit part is to alter or adjust.


Posted on

A Friction Jeweling How-to and PDF for Vintage Hamilton Watches

What’s Friction Jeweling any way?

In 1924, Hamilton took credit for the first improvement in jeweling since Nicolas Facio patented the use of jewels in watches in 1704. Hamilton called their system “improved jeweling”. Now, the Swiss claim they invented friction jeweling, but they haven’t produced any names or dates to substantiate their claim that I can find.

Let’s look at what Hamilton said. First, they claimed that as a  result of years of experimentation and research, that they came up with the “Hamilton Improved Friction Jeweling” method.

They then demonstrated it on the 989 18/0 watch movement.

While difficult to decipher from the image above, the 989 did not have bezel rings holding their jewels in place. You can see the difference in the two types of jeweling methods in the  photos below.

Hamilton released its first 987 caliber wristwatch movement with beveled edged jewels.This method held the jewels in with a screw-held ring. If you take a close look at the image on the left, then you can see two small screws holding a ring over each jewel. Hamilton released the next version of the 987 with friction jewels after the 989 proved it worked.

Little information exists on who actually manufactured the first friction jewels. Since Hamilton bought their jewels from Swiss companies, we can guess that the jewels came from Switzerland. Regardess, design and manufacturing techniques for watch jewels improved around the time Hamilton produced the 989 and subsequently. the 987E.  Hamilton began using jewels able to hold their position with friction alone, which cut down on time and effort to manufacture and service movements.

(You can download a copy of this post. See link at end)

In this small post, we can look at how K&D and Moseley recommended replacing friction jewels.

The method for replacing a broken or dysfunctional jewel involves:

  1. Measuring
  2. Knocking out the old jewel and
  3. Setting a new jewel.

Once you discover the simplicity of friction jeweling, anxiety about it will fade. Let’s go through the steps so we can move forward in our understanding of watch maintenance and repair.

1. Select a jeweling stump with a hole larger than the jewel needing replacement. Place the stump in the die plate of your staking tool and center.

2.      Select a pusher smaller than the jewel needing replacement. Place the pusher in its holder and secure it in the frame sleeve.


Staking Frame with Micrometer

3. With the exception of Balance Jewels, use the pusher to adjust the micrometer. For example, place a watch bridge on the stump facing up. Rest the pusher on the old jewel and adjust your micrometer to limit the movement of the pusher. Jot down the setting on a piece of paper and use it when setting the depth for the replacement jewel.

4. Lower the micrometer stop and press on the old jewel to remove it.

5.  If you have friction type jewel with an undamaged hole, skip the next two steps.

6. If you need to refinish the hole, pick out one of the reamers. Make sure it is large than the existing hole.

7. You can now ream the jewel hole for your replacement jewel.

8. Again, use the holder for the reamer and place it through the staking frame’s sleeve.

9. Don’t let the reamer go further than a millimeter into the hole.

10. Turn it to create a smooth and appropriate size hole.

11. Use a cone miller to remove any burrs from the edges of the hole.

12.  Now, you can place the jewel in the reamed out hole. Make sure the oil cup is face down.

13.  Use the pusher from step 2. Set the micrometer as you did in step 3.

14.  Rest the pusher on the new jewel and then press down the jeweling lever on your frame. The micrometer will stop it from pushing the jewel past the proper fit.

15.  Check to see if the watch part using the hole has a proper end-shake. You’ll need to rely on whatever literature exists for your watch.


16.  If you have to reset the jewel, adjust the micrometer stop and reset the jewel.

17.  If friction type settings are loose in the plates or bridges of your watch, you’ll need to tighten it by closing the hole.

18.  Use a taper mouth closing punch. (K&D punches 31 through 38A. Moseley  E1 through E9).

19.  A taper mouth closing punch draws soft metal in and reduced the size of the a jewel hole.

20.  Select a punch slightly smaller than the setting.

21.  Place the setting on a flat face stump, center it and tap the punch. You will see a groove that will help create a tight fit. Proceed at a slow pace as this tightening process will incorporate trial and error.

I wrote this as a high level view of the jeweling process. The entire scope of jeweling is a body of knowledge in itself. Never-the-less, I found this information helpful. It took the mystery out of the process for me.

You may download a PDF of this post and/or for an extensive treatise by J Bulova click here .

Respectfully submitted

Posted on

Repairing Hamilton Watches: K&D’s 1910 Booklet on Staking Sets and How to Use Them

If you have followed this website you know that the focus has changed. The transition began before Christmas 2013.  I’ve gone from showcasing Hamilton wristwatches for identification to a broader mission.

The emphasis on Hamilton Watch Company remains, and will encompass tracking of wristwatches and pocket watches. Economic conditions affect the price of Hamilton products. I don’t see this as a simple pause. I feel it’s important to share information about the buying and selling of watches.

When people say that time marches on – I don’t see time marching in the streets like a college band or a military parade. Let’s just say, people have trouble finding parts for old watches. Even the popular watches sold in jewelry stores after World War II are one-half a century from their date of manufacture. No one makes parts for old watches.

I collect watches 80-120 years old. You won’t find many parts for those. I’ll keep an eye on suppliers and let you know about those.

Hamilton provided very little documentation for the repair and service of their watches before World War II. The company expected a trained and qualified watchmaker to know what to do. Watchmakers apprenticed.

You will also find documentation to help you service and repair older Hamilton watches.

I have also ventured into finding and identifying vintage watch tools. Finding information on those strange looking creatures venturing out of the closets of deceased watchmakers requires unending research. In the process, I have found documentation on the history of companies that made the tools we all want to use and buy (or sell).

For those of you wanting more information about Hamilton watches from a micro point of view, I follow a blog that should give you what you want.

HandyDan’s website known as the Hamilton Chronicles  provides a rich source of information on Hamilton Wristwatches in particular. I recommend you make it a part of your reading and research.

Back to this blog’s focus:

I wrote the following information in an earlier post:

Opinions vary about what’s vintage and what’s old. If you look on eBay, they label watches made from 1920 to 1970 as vintage. That’s a wide range. I see a huge difference between a 1929 Cushion and a 1965 Stainless Steal Automatic.

In my opinion, when Hamilton stopped putting 987 movements in their best cases the vintage era ended. Afterwards, used Hamilton watches became just old watches. Some call them “mid-century” and “preowned“, but to me, they’re just plain old used watches. Nothing differentiated them from Bulova, Caravel, Waltham, Elgin and so forth. American domination of the watch business faded into the distance after World War II.

Who made the decision to put the best American wristwatch movements ever made in 10K gold filled cheap (not Wadsworth) cases?

When the company decided to offer “popular priced” watches, the decline began. Looking back, you have to wonder who made the decision to put the best American wristwatch movements ever made in 10K gold filled cases? Frankly, I think Hamilton cheapened their line. They remind me of Elgins.

The movement saved Hamilton when the US entered World War II. The Military selected the Hamilton’s 987A and 987S for staff, pilots, officers and infantry.

The vintage era ended about 1939. The next year began the military era. After the war, you suddenly had the copycat era, which was short lived. Next came the Swiss era and the beginning of the end of American made watches.

I have little interest in watches released by Hamilton after 1936. I find the 987A movement a draw, but the overall watches are a cheap version of wristwatches from a great era. I think you can blame that on the Great Depression and lousy management.
As we progress in the change of this blog’s vision, I’m providing materials to help you work on vintage watches.
The following download contains a book about how to use staking sets. It’s the second document of this kind I have posted. If you have an interest in a similar treatise, check the download on an earlier post
I believe the second version of the book, downloadable here will also help you find your way through the world of staking tools and how they can help you work on Hamilton movements. You’ll see a more professional book on staking tools and their use from me in the days and weeks to come.


Posted on

Vintage Watch Tool Identification Guide Download

(The link to download the guide exists at the bottom of the page).

One of my friends said, “I can do anything with a staking set and a lathe, but I prefer specialized tools.”

I agree with him. I look for tools that can help me do a better job at watchmaking. Sometimes those specialized tools do not get the job done and sometimes they do. I have found the pre-owned vintage tools in most cases superior to new ones. That’s not always the case, but using generalities often  gets me in trouble so I won’t say every time.

When I attended Horology School in Paris, Texas at the Institute of Jewelry and Horology, I found a world of surprises. The biggest, perhaps, involved the tools the school provided. Most came from the period of 1930 through 1959. Why? The instructor explained that before digital and crystal watches changed the landscape, approximately 30-60,000 watchmakers worked in the United States. Today, the profession employs about 2500.


The bulk of interest in vintage watches and tools comes from amateurs, self-taught watchmakers and hobbyists. Depending on the progression of the non-certified watchmaker, certain tools become essential. For example, I never thought I would want a lathe. I left horology school when I faced a boring semester of lathe work. I didn’t want to spend $5000 to sit on a lathe.

Today, I need to know how to polish and burnish pivots. My area of interest in watches requires more work than changing parts. Often I have to retrofit them or find parts watches and make changes in wheels, balance staffs and so forth.
I browse eBay for vintage tools. I buy new ones from Esslinger, when possible. On eBay, I’ve gone through the school of hard knocks. For example, a seller listed a balance screw holder as a pin vise. When I asked how she identified it, the seller wrote, “my watch person” said it was a pin vice. I asked her about her “watch person” and it was the widow of a watchmaker.
The active watchmakers of the pre-quartz days have died off in recent years. If you shop on eBay, you will notice hundreds of vintage watches and tools flooding a once tight market. Watchmakers’ estates abound and so do “estate and garage sale” dealers. For the most part, estate buyers haven’t a clue what they have. You will see an item worth about $10 listed for $200. I look for the $200 items someone listed for ten dollars that says “nice watchmakers tool”. I actually find some.
This booklet will help you identify vintage watch tools. It’s from an old catalog dated 1953. I have a second one from Lindstrom dated 1951 and you’ll find it on my site too.
The point of all this? To help you and me enjoy our work and get it done with the best tools possible.

Respectfully submitted
Posted on

Repairing Hamilton Movements: K&D Staking Sets – “How to Book” for Download

For watchmakers and hobbyist who do maintenance or repair on Hamilton movements, you probably have found a need for a staking set. If you’re like me, you only have training for balance wheel staking. I’ve bought a number of books, downloaded PDFs, dug material out of watchmakers manuals. I have spent too much money and had little return.

I found a PDF of the original K&D manual in the public domain. It’s similar to two different ones I bought. I uploaded it to Zamar and used their conversion tool. I converted it to a HTML file and rebuilt it in MS Word. It’s now back in a PDF format. If you would like to download it you can do so here.

K&D Staking Set 18R Deluxe – The Last K&D Product C1997

If you want to save yourself the hassle looking for other materials, I bought a printed book that helped me understand staking tools.

You don’t need a library of staking tools – just one book.

RECOMMENDED

The Watchmakers Staking Tool by Pierce. Mike the Watch Guy re-published it and sells it on his eBay store as well as on Lulu.com. Just Google: Mike the Watch Guy and you’ll find it.

Staking Tools and How to Use Them

This download is not for the book recommended above.  I’ve provided  the original K&D manual – Copyright 1910 and now in the public domain. (Still Relevant).

I added charts as appendixes to help identity the function of K&D and C&E Marshall Moseley punches and stumps.

Good luck.